Train images of a washing machine with tflite model maker to learn it’s status (off, running, almost finished). Use the model on a Raspberry Pi with ioBroker to set an Alexa reminder using tfilte runtime, Simple-Api adapter ( Simple RESTful API) and Alexa adapter.
Go to https://gitlab.com/pzwosta/wamaclassifier to get the code.
The project uses machine learning (TensorFlow Lite, Python) on a Raspberry Pi to predict the current state of a waching machine, send the state to ioBroker and create an Amazon Alexa reminder when it’s almost finished. The Echo device say’s something like: “I remind you: Your washing machine is almost ready.”
As a developer you can adapt it quite easily for any scene you want to be recognized and can manage to monitor with a webcam.
Overview
Prepare
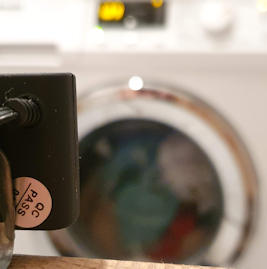
- Take photos of the scene you want to be classified with any USB webcam attached to a Raspberry Pi 4 (fswebcam controlled by a cron-job).
- Create a folder structure on your PC where each subfolder gets the name of a state you want to be predicted. Copy the photos showing this state to it’s subfolder.
- Use TensorFlow Lite Model Maker (jupyter notebook) on your PC with Visual Studio Code or any other IDE for Python development to train a model from your folder structure. As a result of the training you’ll get the model file (model.tflite).
Run
- The project uses the model on a Raspberry Pi with TensorFlow Lite Runtime (Python) to predict the state from any further image of the scene. The Python script for capturing images and running the recognition runs as a systemd service on your Raspberry Pi.
- State changes are sent via http to ioBroker Simple-Api Adapter.
- Simple-Api Adapter receives the state in ioBroker and writes it to the ioBroker Object Hierarchy.
- The state is monitored by an ioBroker script (javascript)
- The script creates a reminder for an Echo device (Alexa) when the desired state is reached.
I’m using the wamaclassifier package on a Raspberry Pi with the following OS-Version and 32bit processor info.
cat /etc/debian_version
10.12
uname -a
Linux raspberrypi 5.10.63-v7l+ .... armv7l GNU/Linux
If you are running different versions you might have to do different steps during installation. Normally I can’t help you here, sorry.
Tipp: ioBroker Adapter device-reminder
You should definitely have a look at ioBroker adapter device-reminder. If you are looking for an easy to use solution without the need for programming skills, you’d prefer it if it fits your needs.
- https://github.com/Xenon-s/ioBroker.device-reminder
- There’s a video how to use it (in German). https://youtu.be/YvEyw2KWzLM
1. Collect lots of images for the scene you want to be recognized
To train a model you’ll need a lot of images of that state. Some hundred for each state is a good rule of thumb. Lighting conditions for example can make a big difference for the training process.
This project uses fswebcam on a Raspberry Pi with an USB webcam attached. You’ll find the necessary info in the project folder fswebcam.
In the shell script fswebcam.sh you’ll find the necessary steps to install the fswebcam package.
The crontab file in the same folder describes how to create a cron job that calls the fswebcam script every 30 seconds.
2. Prepare your development environment
You’ll need a Python interpreter and the ability to run Jupyter notebooks to classify the images and train the model.
If you want to use Visual Studio Code you’ll find a Getting Started tutorial here. The usage of virtual envoronments on your development device is recommended. When you are going to install the wamaclassifier-package on your Raspberry Pi you should also use a virtual environment to seperate the packages required.
If you want to use Visual Studio Code locally with a remote Debian 11 server you’d have to update the system with the python 3 packages and optional the convenience package python-is-python3. Check the python version. It must be 3.6 or above.
    sudo apt update
    sudo apt upgrade
    sudo apt install python3 python3-pip python3-venv
    sudo apt install python-is-python3

    python --version
    Python 3.9.2
3. Create a folder structure for training
Download the images (i.e. using WinScp) to your development device and copy the images to the corresponding folder. The folder structure must look like so:
/allYourImages
   /00_my_state_zero
      2022-05-1_204620.jpg
      2022-05-1_204720.jpg
      ....
   /01_another_state
      2022-05-1_205050.jpg
      2022-05-1_205120.jpg
      ....
   /02_3rd_state
      2022-05-1_215320.jpg
      2022-05-1_215450.jpg
      ....
I recommend using numbers as prefixes to have the state index in the name of the state and ensure having a well defined alphabetic order for the folders. Later on this helps when dealing with prediction results that are given as indices.
In the folder tflite-mode-maker you’ll find the images from my washing machine sorted under the folders with the corresponding state names.
4. Prepare the images
Preparing the images prior to training can improve training results. The images used in this project are cropped and resized to reduce the images to relevant areas: See image_preperation.ipynb. Exactly the same preparation process has to be applied when later on the package runs for life prediction of the state, see src/wamaclassifier/main.py | run | ip.prepare.
5. Train the model
The TensorFlow Lite Model Maker library simplifies training of datasets for image classification. The TensorFlow team provides a Jupyter notebook that can easily be adapted for custom datasets. The customized notebook for this project can be found here as model_maker_image_classification_min.ipynb.
You’ll need the package tflite-model-maker to run the notebook code.
pip install tflite-model-maker
Model evaluation (Step 3 of the notebook) should give you something like that:
9/9 [==============================] - 4s 323ms/step - loss: 0.3853 - accuracy: 0.9650
Model: "sequential"
_________________________________________________________________
Layer (type)                 Output Shape              Param #
=================================================================
hub_keras_layer_v1v2 (HubKer (None, 1280)              3413024
_________________________________________________________________
dropout (Dropout)            (None, 1280)              0
_________________________________________________________________
dense (Dense)                (None, 3)                 3843
=================================================================
Total params: 3,416,867
Trainable params: 3,843
Non-trainable params: 3,413,024
_________________________________________________________________
As a result of the notebook code you should get two files:
- model.tflite contains the parameters for the trained model you’ll be using with tflite runtime to recognize the state of camera images
- labels.txt is used to get the state name from the predicted index value for the state.
Both files are expected to be in the config folder (command line argument -c for wamaclassifier) when the classifier runs on Raspberry Pi.
6. Create the wamaclassifier package
Just by now the wamaclassifier package isn’t available at pypi.org as a pip installable package. With the aid of setuptools you can easily create one from this project:
pip install setuptools
Switch to the root folder of this project using a terminal window and type:
python -m setup.py sdist
This will create a dist folder under the project root containg the package file wamaclassifier-x.x.x.tar.gz. x.x.x is the version you’ll find in setupy.py. If you make any changes to the package increase the version number.
7. Install wamaclassifier package on your Raspberry Pi
Copy the package file to your Raspberry Pi and install it. It’s good practice to install the package and it’s dependencies (see setupy.py | install_requires) in a virtual environment. Just to recap for your Raspberry Pi:
Create a folder for the package files i.e. in the home folder of the user that runs the service (for example as user pi):
On Raspberry Pi OS Bullseye and later there is no standard user pi any more and it’s not recommended to create pi as a user. You can take the user account you created in the wizard environment during the first installation steps of the OS.
pi@raspberrypi:~ $ mkdir wamaclassifier
pi@raspberrypi:~ $ cd wamaclassifier
Create a virtual environment:
pi@raspberrypi:~/wamaclassifier $ python -m venv env

pi@raspberrypi:~/wamaclassifier $ source env/bin/activate
If activation has been successful you will see this command prompt in your terminal
(env) pi@raspberrypi:~/wamaclassifier $
Copy the package file to /home/pi/wamaclassifier and install the package into your virtual environment:
pip install /home/pi/wamaclassifier/wamaclassifier-x.x.x.tar.gz
Installing the wamaclassifier package will also install the dependencies.
In addition to the opencv-python package you’ll have to install some more libs that are not going to be installed by default with the python package. On my Raspberry Pi 4 (Buster, Python 3.7) i had to add these non-Python libs with apt install:
sudo apt install libopenjp2-7 libavcodec58 libavformat58 libswscale5 liblapack3 libatlas3-base
If there is another missing lib you’ll find out later on when running the wamaclassifier package for the first time. You’ll possibly see something like:
ImportError: libxxxxx: cannot open a shared object file: No such file or directory
You can fix this by installing the missing lib by running
sudo apt install libxxxxx.
To be sure to have all possibly used libs follow the instructions for installation on https://www.piwheels.org/project/opencv-python/.
8. Configure the package
You can use the wamaclassifier packages for any kind of state recognition task you created the images for. However there are some parameters that need to be configured.
- Create the folder /home/pi/wamaclassifier/config
- Copy your model.tflite and labels.txt into the folder
- Copy settings.json to the folder
Settings.json contains the following parameters:
initial_idx: Define the initial index from labels.txt to be sent: First line is index 0. Index 2 is the 3rd line from labels.txt.
"initial_idx": 2,
Set the nr. of seconds between images captured by the camera depending on the current index. Define the default nr. of seconds using index .
camera_interval_seconds: In default state the camera catures an image every 10 minutes (600sec). When index 0 (= state of line 1 in labels.txt) is recognized the interval changes to 10 seconds being able to respond faster to state changes. If state returns to a value other than index 0 or 1 the interval returns to 600 seconds.
"camera_interval_seconds": [{"index": "<default>", "seconds": 600 }, {"index": 0, "seconds": 10 }, {"index": 1, "seconds": 10 } ],
simpleApiAddress: IP-Address and port of Simple-Api instance in ioBroker. This has to be configured in the settings of the Simple-Api instance in ioBroker (IP and Port)
"simpleApiAddress": "http://127.0.0.1:8087",
ioBrokerItem: ioBroker object used in the ioBroker script to handle state changes.
"ioBrokerItem": "0_userdata.0.WamaCamera.state",
simpleApiAddress and ioBrokerItem define how Simple-API adapter receives the state changes:
http://127.0.0.1:8087/set/0_userdata.0.WamaCamera.state?value=02_off
crop_rectangle: Chose part of the image to be used for classification. top, bottom, left, right define the rectangle to be cropped.
"crop_rectangle": { "top": 50, "bottom": 220, "left": 200, "right": 350 },
target_size: The target size is the size of the image to be classified. It is defined by the model. It can be found in the model description (model.json). If the cropped size differs from target_size the cropped image is stretched to target_size keeping as much information from the cropped image as possible.
"target_size": { "width": 224, "height": 224 },
minimum_confidence: Results with a confidence lower than minimum_confidence are ignored and not used to change the state.
"minimum_confidence": 0.6,
confirm:You can decide to have a state be confirmed before action is taken informing Simple-Api adapter about a state change. In the example state index 1 (state in the second line of labels.txt) has to be repeated a second time before Simple-Api adapter is notified about the state.
"confirm": [{"index": 1, "repetitions": 2}]
debug_log_path: When the package is run with the –debug paramter debug_log_path defines the folder where to find the debug.log file. If empty it is saved to the config-folder.
"debug_log_path": "",
debug_images_states: To find out about misclassified images the packages saves the images when being run with the –debug parameter. debug_images_states defines for which index images are saved. Images are saved und /debug_imges/. The user running the package must have appropriate access rights for the folder. The following example tells the package to store images for any index apart from index 2.
"debug_images_states": [{ "index": "<default>", "capture": "True" }, { "index": 2, "capture": "False" }]
10. Install and configure Simple-Api adapter in ioBroker
Install Simple-Api adapter (Simple RESTful API) in ioBroker. In the instance settings set the ip-address and the port you just configured in settings.json, for example: [IPv4] 127.0.0.1 -lo, Port 8087
11. Run the package on your Raspberrry Pi
11.1 Start a test run
To start the wamaclassifier package go to the site-packages folder of your virtual environment, for example:
cd /home/pi/wamaclassifier/env/lib/python3.7/site-packages
and run the package like this:
/home/pi/wamaclassifier/env/bin/python wamaclassifier -c /home/pi/wamaclassifier/config --debug
The argument -c tells wamaclassifier where to find the config folder. Have a look at the –debug messages.
- Something like module .py not found*: Check if your current folder really is ../site-packages under your active virtual environment. Check if it’s really active.
- Cannot open a shared object file: Possibly some missing lib from opencv-python. Install the missing lib using sudo apt install libxxxxx
- Any file access problems? Check if your current user (pi?) can access the config-folder and write the debug file to this folder.
if everything works as expected you should see something like this from the debug logger:
[timestamp] -    DEBUG:  Camera image captured. [main.main debug_logger]
[timestamp] -     INFO:  00_10plusminleft: 0.0392156862745098 [main.invoke_classifier debug_logger]
[timestamp] -     INFO:  01_9minleft: 0.07058823529411765 [main.invoke_classifier debug_logger]
[timestamp] -     INFO:  02_off: 0.8941176470588236 [main.invoke_classifier debug_logger]
[timestamp] -    DEBUG:  camera_interval_seconds: 600 seconds [main.set_camera_interval_seconds debug_logger]
[timestamp] -    DEBUG:  http://127.0.0.1:8087/set/0_userdata.0.WamaCamera.state?value=02_off [main.sendStatus debug_logger]
[timestamp] -    DEBUG:  200 [main.sendStatus debug_logger]
ioBroker Protocol shows the event like this:
script.js.common.WamaReminder: {"id":"0_userdata.0.WamaCamera.state","newState":{"val":"02_off","ts":1650735153467,"ack":false,"lc":1650735153467,"from":"system.adapter.simple-api.0","q":0},"oldState":{"val":"01_9minleft","ts":1650733952974,"ack":false,"lc":1650733952974,"from":"system.adapter.simple-api.0","q":0},"state":{"val":"02_off","ts":1650735153467,"ack":false,"lc":1650735153467,"from":"system.adapter.simple-api.0","q":0}}
11.2 Run wamaclassifier as a systemd service
You need an option to run the package without a terminal running. Systemd provides this service.
In the service file wamaclassifier.service you’ll find where to copy it and what to do to run the service.
Adapt the folders to your installation (is it really user pi?). Until everything runs as expected you should keep the option –debug when running the package. You’ll find the debug.log file in the config-folder you passed with the -c argument.
[Service]
Type=simple
Restart=always
User=pi
WorkingDirectory=/home/pi/wamaclassifier/env/lib/python3.7/site-packages
ExecStart=/home/pi/wamaclassifier/env/bin/python wamaclassifier -c /home/pi/wamaclassifier/config --debug
12. Add your ioBroker script to set the Alexa Reminder
You can use the script wamaclassifier.js and adapt it to your needs.
Set the Object id of your echo device from ioBroker | Objects | alexa2.0.Echo-Devices.id-of-your-device
const wamaReminderOptions = {
    ...
    echoObjectId: "alexa2.0.Echo-Devices.XXXXXXXXXXXXXXXX",
    ...
};
That’s it :-)

Author: Peter Zwosta, info@creoggio.de